
It is very common for white genealogists not to know about, or not to know the full extent of, slave holding in their own families. Until a few years ago, I was one of them!
One reason is that genealogy websites do not put this kind of information front and center. In fact, it is often “hidden in plain sight.” If you actually want to do complete and accurate research on your family’s history, you can start by just taking a little closer look at easily accessible records.
Another reason we don’t know much about slave holding ancestors is that previous genealogists, for various reasons, have not shared that information with us! That is finally changing, as more family historians now include slavery records in their online sharing and storytelling.
I outlined earlier my plan for adding enslaved people to my tree. This post is about how I found a lot of the information in the first place, starting with Ancestry.com.
First tip: actually look at the censuses. From 1790 to 1840, the censuses counted slaves per household, and divided them up by age. Don’t just click “save” on Ancestry without looking at both the index record and the image. Indexes are not perfect, and may miss or incorrectly record both free and enslaved people. Check it yourself to make sure. (On some censuses, the relevant checkboxes are on the second page. Scroll forward one page and count lines from the top to find your ancestor’s information on the form.)
Ancestry provides printable templates of the census forms for each year, these are quite handy for both the two-page problem and for “translating” the squiggly old records into something legible.
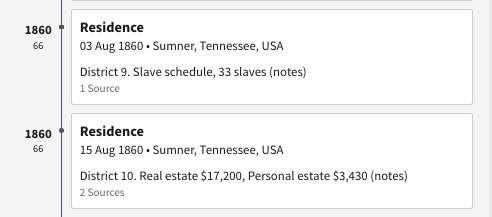
Make a note of how many enslaved people are on that census for your own research. Put it in the Description field of the Fact on your Ancestry tree. Now it’s clear to anyone who finds that person in a family tree search that they held slaves.
Often there is more information than will fit in the Description field, for example the genders and ages of the enslaved individuals. I use the Fact Notes in Family Tree Maker to store that information offline, and put “notes” in the description field as an alert that there is more available.

Check the 1850 and 1860 slave schedules. For some reason, these are either not indexed, not indexed very well, or excluded altogether from the search engine on Ancestry. I don’t know if it is a glitch or deliberate “whitewashing. ” All I can say is that it is certainly very strange. Bookmark these pages for quick reference.
Try searching for your ancestor on the slave schedule. Maybe he (or she) will pop up—but probably not. So, look at the district where your ancestor lived on the regular census for that year. Then browse the images for that same district on the slave schedule. Only slave holders are enumerated, as opposed to everyone in the district, so this doesn’t usually take very long. Enslaved people are listed under the slave holder’s name by number, age, sex, and color (black or “mulatto”) on the census.
Once you’ve located that page, save it to your ancestor as a new Fact separate from the regular census. The record will now be linked to him (or her) and easier to find. As above, make a note in the Description field of how many slaves are counted: you may not have space to list each person individually, so put them in your personal notes for reference. But at least you have alerted other genealogists to the fact that this person held slaves and they can look at the now-linked record themselves for more information.
A note about this: if your ancestor held property in more than one district, check the slave schedule for both districts. On at least two occasions I have found my ancestor living in a different district than his enslaved people did.
Don’t forget tax lists. Before the national census, and often in between census years, states and counties conducted their own censuses for tax purposes. These were enumerated in various ways, usually including acreage of land and its value, as well as the number of slaves and their value. If you don’t see a column for “slaves,” you might see columns for “white polls” and “black polls.” Generally, this was the number of adult males in either category, although I have found instances where black polls appear to include adult females as well based on other records I have from the same time period.
Ancestry has a quite a few of these early tax lists. They are categorized under “Court, Land, Wills & Financial” in the search results, or you can find them here in the Card Catalog. I found William Shaw’s father, Robert Shaw on several of them.

The indexed record will probably only list the name of the taxpayer, so look at the actual image. If the columns are not named at the top of the page, scroll back to the first page of the tax list where you will probably see headings. Then make a note in the Description field of the Fact about the information you find, for your own purposes and to share with others on Ancestry.
There are many more tax lists on local genealogy websites and in the card catalog at Family Search. There are also other types of records useful for researching slavery on Ancestry, such as probate files. I’ve found that Family Search is a better resource for those, though, so I’ll write about them in another post.

I have done much the same for the over 120 people enslaved by my ancestors and their children on my blog at this post: https://scpgen.blogspot.com/2017/08/slave-name-roll-project.html
LikeLike
Boy, that is really organized! Maybe I will make a comprehensive list one day. I keep finding new names, unfortunately…
LikeLike
I like how you have incorporated them into your Ancestry pages. I need to do that.
LikeLike